## The strange little machine that builds upward
I still find it slightly ridiculous that a machine can take a thin strand of plastic, push it through a hot nozzle, and somehow turn that strand into a solid object sitting on my desk. There is no cutting block from a larger piece. No mold has to be carved first. The printer simply starts at the bottom and keeps adding material.
That basic trick is why **how 3D printers work** is so much more interesting than the finished gadget suggests.
I can tell the printer to make a bracket, a phone stand, or a model of a gear, and the machine converts that digital design into hundreds or thousands of thin physical layers. The result looks almost magical until you see what the printer is actually doing.
And the core idea is wonderfully simple: **add only the material you need, exactly where the design says it belongs**.
## A 3D printer starts with a digital model
Before the nozzle moves, the printer needs instructions. Those usually come from a digital 3D model created in computer-aided design software or downloaded from a model library.
The model itself is not normally sent straight to the printer as one giant command. A slicing program takes the 3D shape and cuts it into a stack of very thin horizontal layers. Each layer becomes a set of movements for the machine.
This process is called **slicing** because the software is effectively making a tall digital object into hundreds of flat cross-sections.
The [STL file format](https://en.wikipedia.org/wiki/STL_(file_format)), for example, has long been used to describe the surface geometry of 3D objects for manufacturing workflows. Modern printers can also use other formats and printer-specific instructions, depending on the software and machine.
The slicer decides things I would never notice just by looking at the finished object: where the nozzle moves, how much material is extruded, how fast the print head travels, and where support material may be needed.
So there is a hidden stage before printing even begins. The printer is not really "understanding" the object. It is following a carefully prepared recipe of movements.
That recipe is often called **G-code**, a set of machine instructions commonly used in computer-controlled manufacturing.
## Then the plastic has to become printable
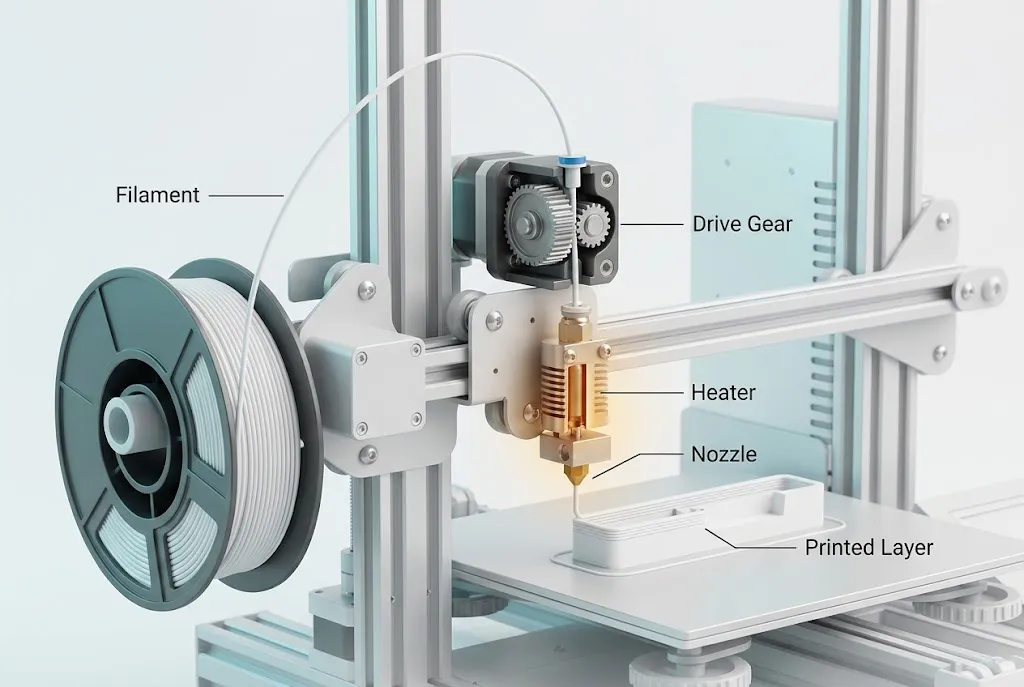
Most familiar home 3D printers use a process called **fused filament fabrication (FFF)** or fused deposition modeling, a related commercial term. Instead of starting with liquid plastic, these machines usually begin with solid plastic filament wound onto a spool.
A drive mechanism pulls the filament forward. The filament enters a heated region and softens as its temperature rises.
Then comes the part that makes the whole process click.
The softened plastic is forced through a small nozzle.
Imagine squeezing warm toothpaste through a narrow opening. The principle is not identical, but the physical intuition is useful: a controlled feed pushes material through a smaller path, producing a continuous strand that can be placed precisely.
The [Prusa Research documentation](https://help.prusa3d.com/article/basic-info-about-3d-printing_2754) describes this kind of filament-based printing process in practical detail, including the role of the nozzle, filament feed and printed layers.
The plastic does not stay soft forever. Once deposited, it cools and solidifies enough to support the next pass.
That timing matters enormously.
**The printer is constantly balancing heat, motion and cooling.** Too much heat can leave a soft, misshapen part. Too little can produce weak bonding between layers.
This is why your 3D printer can make a clean little object in one room but produce a stringy, warped mess after a seemingly tiny change in temperature or print settings.
## The nozzle is only one part of the trick
I used to picture a 3D printer as a hot glue gun attached to a computer-controlled arm. That is not completely wrong, but it leaves out the clever part: the nozzle has to move through space with repeatable precision.
Most desktop FFF printers control movement along three axes. The exact mechanical design varies, but the printer must position the nozzle or build platform accurately in X, Y and Z.
The X and Y directions define where the material goes across a single layer. The Z direction changes the height so the machine can begin the next layer.
The printer may trace the outer wall of a part, move inward to create a fill pattern, retract filament between separate features, then shift upward before repeating the process.
That means the object is not being "drawn" in the ordinary sense. It is being assembled through a sequence of controlled deposition paths.
A useful comparison is the way [CNC machining](https://en.wikipedia.org/wiki/Numerical_control) moves a cutting tool according to digital instructions, except the goal here is usually the opposite. CNC machining removes material. FFF printing adds it.
This is the big real-world connection: **a 3D printer can create a shape without starting with a larger block and throwing most of that block away**.
For a small custom bracket or prototype, that can save material and eliminate several steps of conventional fabrication.
## Why the layers don't simply fall apart
Look closely at a typical FFF print and you can often see faint horizontal lines. Those lines are not a manufacturing defect in themselves. They are a visible record of how the object was built.
Each layer has to connect with the layer beneath it.
When fresh, heated plastic is deposited onto an earlier layer, the new material can partially soften the surface below it. At the microscopic level, polymer chains can diffuse across the boundary, helping the two layers bond as the material cools.
That is one reason printing temperature matters so much. The polymer needs to be hot enough to form a dependable bond, but the process also has to cool in a controlled way so the geometry stays where it belongs.
The final strength of a printed object is therefore not identical in every direction. A part can behave differently when pulled along the direction of its layers compared with a force applied across those layers.
In simple terms, **a 3D-printed object has a manufacturing history built into its structure**.
That becomes obvious with a failed print. Sometimes the outside looks fine, yet the part snaps along the layer lines when stressed.
## The printer sometimes builds temporary scaffolding
Not every shape can be made by stacking layers directly on top of something underneath.
Imagine trying to print a horizontal roof with nothing beneath it. The nozzle would eventually have to deposit plastic into empty space. Gravity has a vote here.
That is where **support structures** come in.
Slicing software can generate temporary material beneath overhangs and around difficult geometries. After printing, those structures are removed mechanically or, with some specialized materials, dissolved using an appropriate process.
This is one of the least glamorous parts of 3D printing, but it explains why the same digital model can produce very different results depending on its orientation.
Turn a part 90 degrees and the printer may need less support, use a different layer pattern, and produce a different balance of strength and surface quality.
Designing for 3D printing is therefore partly an exercise in thinking about **how the machine will physically reach each piece of the shape**.
## Why a 3D printer can't make every shape instantly
I can upload a spectacular model and still end up waiting hours. That sounds excessive until I remember what the machine is actually doing.
The object is being built from many individual layers, and each layer requires thousands of coordinated movements in some prints. A larger object, finer layer height, more internal structure, or slower print speed can all increase the build time.
Layer height is especially important. A smaller layer height can produce finer vertical detail because the printer is dividing the object into more slices.
But more slices mean more work.
That trade-off is visible in everyday printing: a rough prototype may finish much sooner than the same shape printed with fine layers for a smoother surface.
This is why **resolution, speed and material behavior are tightly linked** rather than being independent settings.
A very fast print is not simply a normal print with a speed slider pushed to maximum. The printer has to move, extrude and cool in a way that remains physically stable.
## FFF is only one kind of 3D printing
When I say "3D printer," I am really naming an entire family of manufacturing methods.
FFF is popular because the machines can be relatively affordable and practical for prototyping, education and hobby work. But another major technology is **stereolithography, or SLA**.
Instead of feeding filament through a heated nozzle, SLA printers use light to cure liquid resin layer by layer. The exact chemistry and optical system vary by machine, but the basic idea is different enough that the finished parts can have a distinct surface quality and level of fine detail.
There are also powder-based systems, including selective laser sintering, in which energy is used to fuse or consolidate powdered material into a solid shape.
The [U.S. National Institute of Standards and Technology](https://www.nist.gov/topics/additive-manufacturing) describes additive manufacturing as a group of processes that create objects by adding material layer by layer from digital models.
That common principle is the important part. **Additive manufacturing is the family; FFF, SLA and powder-based methods are different ways of carrying it out.**
## The real breakthrough is what happens before printing
It is tempting to think the printer itself is the invention that changed everything. I think the more interesting shift happened in the full chain from digital design to physical object.
A designer can change a dimension in software, slice the revised model, and send a new set of instructions to the machine without making a new mold or cutting tool.
That means the manufacturing process can become surprisingly flexible.
A prototype can be altered overnight. A replacement part can be customized for a particular project. A classroom can go from a digital idea to a physical model without a traditional machine shop.
And because the geometry begins as digital data, a physical shape can be reproduced when the same files and manufacturing conditions are available.
This is one reason 3D printing has found a place in product development, research, medicine and aerospace manufacturing. The technology is not equally suited to every job, but it is unusually good at making **complex, low-volume or customized parts**.
## What I find most surprising about it
The weirdest part is not that 3D printers can make complicated objects.
It is that the machine never sees the finished object the way I do.
It sees coordinates, paths, temperatures and commands. A nozzle moves a few millimeters, deposits material, changes direction, and repeats that tiny action again and again. Somehow, all those local decisions add up to something I recognize as a real object.
So when I watch a print slowly rise from the build plate, I am not really watching a machine copy a thing.
I am watching **geometry become motion, and motion become matter**.
That is the real trick behind 3D printing. The machine does not need to understand the object. It only needs a precise enough set of instructions to build it one layer at a time.
## The takeaway: a digital shape becomes physical, one layer at a time
A typical filament 3D printer starts with a digital model, slices it into layers, feeds plastic filament into a heated nozzle, and deposits that material along controlled paths until the object rises from the build plate.
The process looks futuristic from across the room. Up close, it is a disciplined sequence of heat, pressure, movement and cooling.
And that is why 3D printers feel so magical: the finished object is solid and familiar, but the route to it is almost absurdly incremental.
One thin line.
Then another.
Then the next layer.
Verified Expert
Alex Rivers
A professional researcher since age twelve, I delve into mysteries and ignite curiosity by presenting an array of compelling possibilities. I will heighten your curiosity, but by the end, you will possess profound knowledge.
Leave a Reply
Comments (0)
No approved comments yet. Be the first to share your thoughts!
 Join Us

 Unknown Author





































Leave a Reply
Comments (0)